Preparing for Late Summer Budding Procedures
The decision to conduct your own tree propagation can have many risks but also benefits. The cost of purchasing trees from nurseries can get quite expensive and sometimes it is impossible to obtain the desired rootstock-scion combination unless ordering is done 1-3 years ahead. Many growers think about grafting their own trees in early spring, whether by root grafts, cleft grafts on older trees or something simple like whip & tongue grafts. While the early spring procedure does provide the whole growing season to establish a young tree, grafting typically does not produce as strong a tree and is a more involved process (therefore more room for errors and graft failure) than budding. Sometimes, growers have more time in the early spring, so the choice is obvious but late summer provides a nice window to either re-propagate failures from the spring or gives you an opportunity to make that perfect combination of rootstock and scion that you now have access to. I have propagated thousands of trees myself but there are plenty of good techniques that many of you out there have that are probably improvements on what I do. However, let’s take a look at the factors that will help determine your success:
1. Rootstocks– The correct rootstocks must be matched with the appropriate scion cultivars. Among top choices for rootstocks from Geneva/Cornell are G.202 (with vigor similar to M.26), G.935 (vigor slightly less than M 26), and G.41 (vigor like larger M9 clones; Honeycrisp has less biennial tendency on it). Other clones include G.11, G.16. While many growers are using Geneva rootstocks now, there are still some questions on performance and it is difficult to fully endorse them without more data. The most popular full-dwarf rootstock in WI is Budagovsky 9, but that could change quickly as more becomes documented on the winter hardiness and greater disease resistance, precocity, insect resistance and fruit size of clones on the Genevas. Other rootstocks that are being used include various versions of virus-free M9 and M26. Make sure your rootstocks are kept in as active a growth as possible, allowing you the flexibility to either do T-budding or chip-budding. This means training to one stem and keeping them that way by pinching off and branch shoots. Push plenty of N fertilizer and irrigate on a regular basis, along with weed and insect control. Remember, aphids can spread viruses quite quickly through your rootstocks, so be aware of when control is needed.
2. Cultivars and budwood-Remember, check the legality of propagating patented cultivars; either you must get permission (unlikely) or choose one that was either never patented or the patent has expired. Honeycrisp is a good example of a very popular cultivar on which the patent has expired and is legal to propagate. However, there may be sports or strains of cultivars that are still under patent, so check to make sure, using such tools as Google Patents: https://patents.google.com/patent/USPP7197P/en. Another aspect to keep in mind is the use of trademarks; just because the patent has expired, does not mean that you can use the trademark name when selling fruit from those trees. If you are obtaining budwood from a nursery or other orchard, make sure they know your intended timing of budding so that budwood can be harvested and sent to you when you are ready to go. Also, no matter who the supplier is, make sure you have a good idea what the diameter of the budwood is (this is important, especially with chip budding which I will discuss later). If you are using your own trees for budwood or another orchard is the source, again, make sure you realize the greater likelihood that the budwood may have a virus load which is what you may inherit on all your new trees that will be propagated and could possibly affect your orchard performance for the life of the new orchard. Check to see what procedures were used on the donor trees to keep them as nearly virus-free as possible. Budwood should be from current season’s growth and sufficiently mature along most of the stick to have well-matured buds. Budwood that is shipped should have all the leaves removed, with the petiole “handle” remaining. The budwood should be shipped in as expedited a manner as possible and packed with ice packs. Ship on Mondays or Tuesdays! When you receive the budwood make sure to keep it hydrated and cool. I wrap my budwood the whole length in moist paper towels in a sealed plastic bag in the refrigerator.
3. Matching cultivar to rootstock and training system/growing conditions– This is one of the most critical points in the entire process. You want to have uniformity and good response from your propagated trees. An assessment of which growing system you will employ is critical to the rootstock choice. The old central leader system has mostly fallen out of favor, even with semi-dwarf trees, and only 2-300 trees/A, profitability and early cash flow are not possible. Most growers planting a new orchard will have some version of Vertical Axis (400-900 trees/A), Tall Spindle (800-1500 trees/A) or Slender Spindle; and some are even considering Super Slender Spindles where trees are planted just 1-1.5 ft. apart within row. Most versions/systems use a trellis and/or staking and many hybrid versions are being developed. The density that is used with your system also depends on the cultivar and soil, along with availability of irrigation (a must in my opinion). Planting density is the single most important variable that determines the orchard yield for the first 5 years. So, what density for your orchard? The cultivars you choose vary considerably in natural vigor, with spur types (Macspur) the least vigorous, along with cultivars like Honeycrisp and Macoun. Gala, Empire, Golden Delicious, Jonamac and Idared can also be considered weak to moderate vigor. These cultivars would be matched with rootstocks that have more natural vigor and/or plant them at closer spacings in the orchard. Naturally vigorous cultivars include Gingergold, Cortland, Jerseymac, Fuji, McIntosh, Jonagold and Spartan. These cultivars should be planted on typically the most dwarfing rootstocks like Bud 9. Fertile soil and irrigation can help counteract the effects of low-vigor cultivars; and render vigorous cultivars even more unmanageable if they are budded on higher-vigor rootstocks. In determining the number of trees to bud, keep in mind any factors that may be less than ideal to account for mortality.
4. Have the right supplies and equipment ready to go– I usually have 3/8-1/2” X 6” budding rubbers available for both T- and chip-budding. Smaller rootstock diameters and budwood may work better with ¼” x 4”, so you might want to have some of them on hand. I use 1”-wide stretchable Parafilm grafting tape or poly budding tape (comes on a roll with perforated sections to tear off) for the chip-budding. Have a large cooler with ice inserts for keeping budsticks cool while you are in the field. When I do a row of rootstocks, I keep a 5- gallon bucket of water available to keep the budwood soaking for that particular row of rootstocks I am budding. Sharp budding knives (2) are an absolute necessity for success. The sharper they are the better the results (you have more control) and the less likely that you will get injured in the process. Always make cuts towards you, not away from you (again, more control). Have some sharpening tools for easy access in the field.
5. Which method: Chip-budding or T-budding? Chip budding in late summer (August -September) with current growing season’s “resting” mature buds give excellent results even when the rootstocks’ cambiums are not active (bark not “slipping”), whereas T-budding has a relatively narrow window of opportunity as the cambium must be active and bark must “slip” to work. Chip budding requires more propagator skill in order to match up the cambiums of both the rootstock and scion. The diameter of the scion budstick should be as close as possible to the diameter of the rootstock because of the chip size taken and the curvature of both affect the fitment of chip bud into the rootstock, and eventual matching of scion bud and rootstock cambiums. I have worked with different diameter budsticks than rootstocks and made it work but it is not easy. Chip budding requires more care to maintain chip bud contact and prevent drying out after the procedure than T-budding. Lastly, chip budding produces a much stronger long-term union between scion cultivar and rootstock and new growth from the chip bud is straighter and produces more uniform tree growth than what typically occurs with the T-budding method. So, what about T-budding advantages? The procedures is much quicker and you can take the wood piece out from under the bud to make more contact and adjust for rootstock stem curvature. Some species “take” much better without the wood piece under the bud! Lastly, there is little protection needed after the procedure other than just tying the budding rubber and not covering up the scion bud in the process.
6. The Procedure: Lots of good YouTube videos out there!
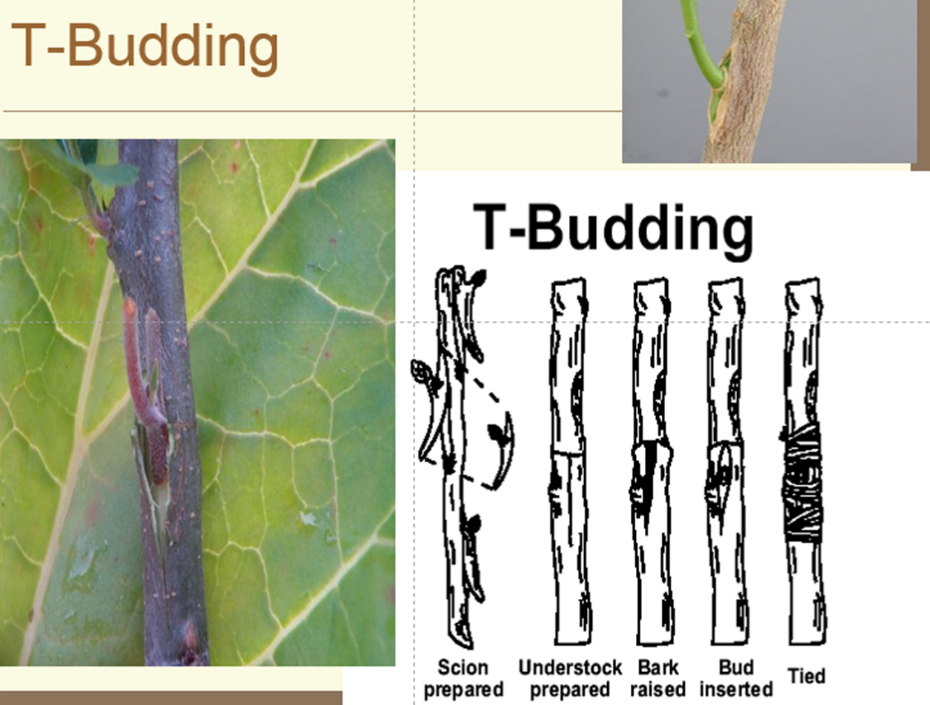


The scion bud should be slipped down and be snugged into the base of the T-cut and then wrapped with overlapping coverage with the budding rubber. The critical part is inserting the budding rubber behing the bud and then keep wrapping as in the insert picture. Below is a picture of a plum that I T-budded; it healed, overwintered and then sprouted the next spring. As soon as bud gets growing well, cut off the rootstock just above the bud. T-budding requires about 6 weeks of healing before the bud is able to tolerate a hard frost in the fall and be able to survive the winter.
Chip-Budding

As an added precaution, I like to wrap the inserted chip bud with a budding rubber in order to get good contact when there is a less-than-ideal fit and then use the stretchable parafilm to seal it all until healing takes place (Fig. 1). Chip-budding requires about 8-10 weeks of healing before the scion bud can survive the first hard frost and be on track to make it through the winter, so growers in the northern part of the state should be budding by late July to mid-August and growers in southern Wisconsin should be finished budding by early September, at the latest. Below is a picture of chip budding I conducted on a plum, with new growth appearing the next spring, showing the real reason chip budding is superior-look at all that healing all the way around the whole chip bud! (Fig. 2).

Figure 1 – Smith bud
protection
Figure 2-
Smith chip
bud growth
7. After care- Just like with grafting, when the bud starts to grow the next spring, make sure that the budding rubbers have sufficiently degraded so that they do not cut off circulation and growth around the new bud. Rootstock buds will want to grow as a priority over the “foreign” bud, so make sure any competing rootstock buds are rubbed off. Do not let the growing bud branch too early-you want to have a nice unbranched whip the first year. If you are growing it a second year in the nursery for branching/feathering, you will want to head back the whip to initiate and obtain 10-15 feathers (branches) starting at the correct height for you. Budded trees can put on 6’ or more of growth in 1 year, so depending on your set-up, you may need to tie to bamboo stakes or trellis to protect the young growth from braking off in winds.
This article was posted in Apples and tagged Apples, budwood, chip-budding, late summer budding, rootstocks, t-budding.